Saturday, 17 November 2012

This Is How We Do It

Yesterday we had Jeremy and Adrienne over for supper, and once we'd eaten, the four of us went on a photo scavenger hunt together - following a list that the men had put together. There was a lot of fun, a lot of laughter, and a lot of Penner-esque ridiculousness (yes. those boys are crazy.... and it rubs off easily). We went all over Steinbach to collect shots of things like standing on a fire hydrant (probably illegal) and looking at the sun (somewhat difficult since it was night time... we ended up taking a picture of a Sunchip bag!). Here are some of the highlights. 

Fire hydrant photo bomb!:


In a shopping cart:


This was supposed to be in a snow bank... Derek thought it would be fun to put his head in the snow bank. ...:


We went to the mall because we needed a shot of us hugging a mannequin, and we ran into Patrick, Trudy, Kirsten, and Hannah... figured they were a pretty good group to do "awkwardest picture ever" with!:


And of course, for the "picture holding an animal" we stopped at the pet store, where they had adorable Min-Pin/Pug puppies... I didn't want to let her go and tried very hard to convince Derek that we ought to buy her right then and there. Thankfully(?) he's sensible and refused, though later he said that I was so cute that he was quite tempted to give in... maybe next time? She did kick me in the lip; and I was bleeding for quite awhile... but I thought that was fine!:


Picture of someone tripping - though this was "staged" it turned into a real trip, because seriously, they got me to be the "trip-y" and we all know that's going no where good... At least it looks realistic?:


Obligatory "girl lifting guy" shots:


And here's the Kung Fu fighting:


And the end, with a battle to the death:


And we finished it off with Slurpies (thanks, Jeremy!) because we're all Manitobans by now, and that's just what Manitobans do when it's below freezing outside (don't ask me why... I may live here and own a house here, but some of the traditions still don't make sense):


So, that's how we party here in Manitoba once the snow hits. What're all of you doing to try to make our six month long winter bearable? And for those of you who still see sunshine, what's it like where it's warm? You know I love to hear from you!

Thursday, 15 November 2012

Fantastic and Free - November: Rearranging

It's about time I shared another one of these! This is a series I started back in September, when I did two weeks straight with one every day (it was a way to keep me excited about things even though Derek and I had almost no money in the bank). This month's edition had to do with just moving some of the things that I already owned around. We still have a number of items that don't have a place to live yet, so some of the items pictured here were sitting in boxes, but some of them were hanging out in a place where I just didn't quite love them. It's important to remember that decor accessories don't have to stay where you originally put them in your house! It can be really refreshing to just move a couple pieces around and see the difference it makes!

Yesterday when I shared the update about me painting the door and the linoleum, this is what my toilet - and the shelf above it - looked like: now, there's nothing wrong with it. In fact, it's clean, it's a modern shape (the toilet, I mean), there's a nice candle on the shelf... but I felt like it could use a bit of pizazz. 


The push to get that "pizazz" actually came when my dear hubby asked me what happened to the toilet paper basket. You see, up until about two weeks ago, we'd been storing a couple extra rolls in a basket on the top of the tank (there are some pictures of it in this post from way back when!) but I moved the basket two weeks ago to near the front door - because I needed something to corral the various odds and ends that sit by the door on their way out (movie rentals, cheques to deposit, mail, etc). Anyway, last night, after Derek went to bed, I trudged over to the bathroom to brush my teeth and I noticed that he'd put a couple rolls on the bottom shelf of our bathroom cabinet. I thought it was a fantastic idea! But it made the stuff we already had there feel crowded, so I decided it was finally time to implement a plan I'd had swimming in my head for awhile.

I quickly darted around the house, grabbing a few things as I went, namely a bright blue tray that I was given at the Ontario bridal shower. It took some playing around, but I ended up settling on an arrangement with a picture of the two of us from our first Christmas as a couple, a candle holder from Superstore (it had been in the bathroom already), a pinecone, and a couple of small dried flowers. 


I love the bright blue jewel tone of the tray, with the softer sea blue of the votive. And the pinecone really gives it that wintery feel...Though I'm wondering if it's weird for there to be a picture of us in the bathroom? Maybe I'll switch it out for something less... awkward.

Wednesday, 14 November 2012

Making over the Bathroom #2 & 3: Painting Doors and Experimenting With Linoleum

This is what the door to our bathroom looked like this morning. Not only was it a "lovely" orange colour, but it was literally the only door in the house that wasn't white... And to make it worse, it was actually painted white on the other side! 


So, I first sanded it down, just a little bit to get rid of the shiny top coat - so that paint would stick better.


While I was at that, I also removed the front part of the door knob.


I'd also decided that I would put a fresh coat on the back of the door, because there was some damage/uncovered spots there, so I made sure to go over that too with the sanding block. 


I wiped off the dust on the door and the floor, and as it was drying, I set about removing the rest of the door knob. It turned out to be a far more difficult task than I expected. In fact, it probably took me about a half an hour - and it was all because of this screw (scroll down. Yup. That one). The bottom one came out really easily, but the top one sure was darnded difficult. You see, I did the whole normal using a screwdriver.... and the stupid thing just turned and turned and turned, and didn't come out. I texted my dad, who suggested using a hammer, or a flathead screwdriver, or a pair of pliers to pull it out as I unscrewed it. I tried. It didn't work. What I ended up doing was using a magnet, a straight pin, a bobby pin, a screwdriver, the pliers, and eventually, my fingers. It was really complicated. And I didn't take a picture because I needed both hands... and then some. 


However, once I had that all taken care off, I grabbed the primer that I picked up from Canadian Tire last night ($12 for a gallon!) and prepped it to go. I got a latex based primer because the oil based ones have a lot of fumes in them and can be unhealthy in the short term (headaches, feeling high, etc.) and in the long term (cancer!). Especially since I would mostly be working in the tiny, tiny bathroom, I didn't want those unwelcome effects. 


I used a paintbrush and a small foam roller for the work (paintbrush for any needed cutting in, and the roller for the rest of it). Oh! And one tip - that I actually learned at Humber College, back when I was taking classes in set painting - for a new can of paint, is to hammer a few holes around the edge, to make any paint drips fall back into the can, thus keeping that space paint free so the lid can close properly. 


Here's what the door looked like after one coat of primer. It was pretty faint, but that's alright since the primer is mostly to provide a rough surface for the paint to hold on to. 


 While I had the primer out, I decided I ought to experiment with something that I've been considering doing since we moved in: painting the linoleum in the bathroom. Now, when I mentioned this last week, I was warned that it wouldn't be a good idea to paint the floor, but I figured, since we don't walk on the walls, what's the harm in trying it? I mean, honestly. It's not like I like the existing linoleum; we definitely won't be keeping it forever, so why not? Besides, experiments are always fun!


And really. Could anything be worse than faded yellow with ugly pink flowers?


And so, my day disappeared into the bathroom (I started in the morning and didn't finish until the evening. Painting is exhausting!). But when I emerged, after, what... seven hours? This was the finished product:


Sorry about the poor lighting. It was definitely dark by the time I emerged. But honestly, doesn't it look so much better? While I don't think close inspection would leave anyone believing it's actually tile, it sure looks a loooooooot more like tile than that fifty year old linoleum design. And I have plans to make it feel even more a part of a finished bathroom. But scroll up again once more. I love, love, love how it looks with the grey walls. And surprisingly enough, it even makes that ugly vanity countertop seem less glaring - though nothing can hide that pink sink! It's fantastic that I was able to redo the entirety of the bathroom walls with two buckets of paint, and a bucket of primer (and all three of those gallons have plenty of leftovers just waiting to be implemented in something else... kitchen table, anyone?).

Though, unfortunately, this did happen in the shower when Derek got home from work and cleaned himself with semi-wet paint on the wall. So, I think I'll finish the inside of the shower when I know there'll be at least twenty-four hours for the paint to completely dry... so there's no more of the peeling and sliding off. But even when I look at this, I just have to scroll back up (the shot with the mirror and the herringbone towel is my favourite!) and I'm reminded of how much it was/is totally worth it.


Note: The paint that I used is Glidden's EasyFlow in semi-gloss (I took the can right off the shelf, so that I'll always know what colour to use; no forgetting paint names for me!). I just chose the cheapest gallon of paint that Canadian Tire had. It seemed to work pretty well, though I had to use a bunch of coats. I'm not sure if that was the paint? Or the fact that I was using white? Or the foam roller? Who knows. 

Tuesday, 13 November 2012

Books.

To my extreme excitement, today John and Sherry's book (from Young House Love) arrived in the mail. I was beyond pumped. You may think I'm kidding, but I'm not. In fact, when I remembered after supper (which was delicious and cheap, by the way! 30% off steak, roasted potatoes, and grilled asparagus. Yum!) that the book might be arriving today, I darted from the house out into the cold and down a block to our mailbox - in Steinbach they don't have any mailboxes at the houses. It's weird. I know. And in fact, it had arrived! I rushed back home, and started to tear it open, and then realized that since I blog so much about home decor, I ought to document this, because I get so much inspiration and drive from reading John and Sherry's blog... so, reading their book will probably continue to inspire me to transform our quirky home!


First sighting of the book! Be still my beating heart!


Oh, and I also got Domino's book - Domino: The Book of Decorating because I've read lots and lots about how fantastic it is for inspiration. Yay for taking things off the internet and onto something you can hold and touch and feel! It's great to be collecting books that I feel will really be useful - not just fiction that once I've read it, sits on a shelf and collects dust. I imagine these books will end up worn and paint splattered as I peruse them and prop them open and flip through them to follow the pictures.


Close up!


And of course, how can I share about two home decor books without putting them on display in a shot? The book on top is The Art of Manliness, another fantastic non-fiction read, from the blog the Art of Manliness, which all men (and wives, and wives-to-be) should read. It's run by husband and wife: Brett and Kate McKay, whom Lana and I are convinced are secret Christians (they don't talk about their faith much on the blog, but we see snippets of it). But don't you love how the spines look together? I love it when books are both pretty and functional. Mmm... time to go do more reading!


Monday, 12 November 2012

Food Tips!

Today Derek and I did some grocery shopping. Now, you have to know something about Derek and I and food. We both love food. We really, really enjoy it... and at the same time, about half of the perishable items that we buy go bad before we get to them. I'm not really sure how it happens. But it does. And it sucks. We've definitely gotten better at eating the things that we get, but there are times when we pull out mouldy vegetables or mouldy cheese, rotten fruit, etc. Not really my favourite. I'm not a fan of gross, mouldy food. And I'm especially not a fan when it's stuff that was in our fridge - and, most importantly, what we paid for.

So, today when we went to grab some groceries, I decided that I was going to do everything I could to make them last as long as possible - aka, until we actually eat them. I've been doing a lot of pinning lately about things like freezer bag cooking, recipes for the average family, lists of meat marinades, and twenty-seven ways to make groceries last longer. And so, when we picked cheese, green onions, and ground beef, I decided to try some of the suggestions.

First, I cut the long block of cheese in half, and then cut one half in half again. I then took one of the two quarters, and wrapped it in paper. The website said to use parchment or cheese paper... but we didn't have any, so I used tissue paper, since we had a huge excess of it from moving (I used unused paper, just to keep it sanitary.


Then I put the wrapped up cheese in a plastic bag, and put it in the warmest part of the fridge - the vegetable drawer (if you have a cheese drawer, that works great too!).


I took the second quarter and grated it up into a container that we have (specifically for grated cheese; it has three lids, one regular and two with grates - it was a wedding present, and we love it). I then put the last half of the cheese (wrapped up in paper, and in a plastic bag) into the freezer. Cheese apparently can be frozen for up to three months; after the three months, it gets super crumbly. 


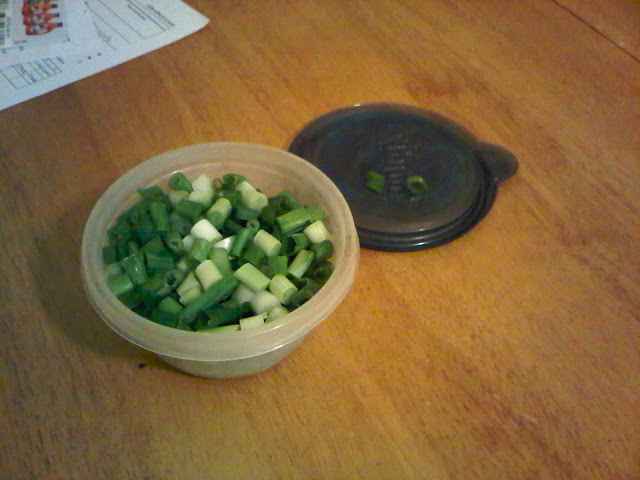
For the green onions, I chopped them up entirely, separating what we needed for our meal (nachos with our friends, Lana, Anja, and Jerome! Delish!) from the rest of it. The leftovers, I put in a small plastic container (after making sure they were dry - don't want freezer burn!) and threw them in the freezer. The website said to put them in a plastic water bottle, so that you could easily sprinkle them out, but we didn't have any. So, I figured that our plastic container would work *fingers crossed.


And finally - though this wasn't something on the website, I thought it related - I split up the ground beef. We buy it bulk (when we have the freezer space) and extra lean. We get the extra lean, even though it's more expensive, because I really don't like the greasy texture that I find comes with even the lean meat. Besides, it's more healthy. Anyway, I split up the huge package into three regular sized tupperware containers, because dang! it's annoying to have to try to separate meat when it's frozen. Honestly, there've been times when I'm lazy when we first buy meat - and I always, always regret it.


So those are some of the tips that I've gleaned about food. I'll let you know how it works out?

Thursday, 8 November 2012

First Things First

I would like to introduce you all to my brand new bathroom! Well, okay. It's hardly brand new, but it almost looks that way! Today I spent my entire day... painting it! Ta dah!


We used a lovely greige (that's grey/beige, for anyone confused by my combination of two words) to both lighten up and open up our tiny little bathroom. I love the colour, because depending on the lighting, it has so many awesome undertones. It can look blue, or purple, or beige. Really just depends on it's mood, I suppose. Now, unfortunately, my camera doesn't have a very wide angled lens, so I can't actually take pictures of the whole room, but I do have a few comparisons of individual spots, so you can see the difference!

Here is the shot of my painting with the original wall colour (a weird reddish-brown colour that could either look like dried blood... or poop... on a particularly bad day).


And here it is against the new backdrop. Oh, so much softer and calmer... and so much less like poop.


And here is another shot (with testing swatches) from near the sink. Are you understanding why the brown colour just wasn't fitting with my mojo? I mean, seriously. Who paint a tiny, tiny room such a gross, dark colour?


Ah... the same spot, but looking so much lovelier. I almost feel that our new paint even seems to make the sixty year old linoleum seem less glaringly ugly.... Though, I do have plans for that (I'm considering priming and painting it white. Anyone have any luck painting linoleum before? Or should I just get some stick on linoleum tiles instead?). 


Another shot of the new paint colour... I love how it looks with our charcoal grey bath mat. And it really ties together our towels/stool/shower curtain/mat in a way I wasn't even expecting. They actually look like they belong in the same room now. So amazing. Though, really... that yellow floor needs to go.


And though this isn't the best shot, you can see that I actually painted the ceiling the same colour. I've read that in small rooms, painting the ceiling the same colour as the walls really helps to open up the place. I think I agree. Believe me, our bathroom feels much more open than before. I guess one room down, six-ish (not including hallways) to go. 


Oh, and for anyone curious, we picked Wish by Benjamin Moore, though we got it in CIL's no VOC bathroom and kitchen paint (the satin finish, for something that's good for damp rooms - less mold and mildew).

Wednesday, 7 November 2012

Trial and Error

So last week I shared how I completely failed at finishing the Pinterest challenge, but managed to paint some art. I even managed to share pictures with you all of the not so completed work. Yeah. Yeah, I know. Sloppy blogmanship (blog-womanship?) right there. But today you get to see the "finished" art, and you get to see how - being the slightly fickle person that I am - I decided to completely redo one of the pieces.

So, here's the one I re-did. As you can see, I'd already started doing it over before I remembered that I ought to take a picture. So, if you scroll down past that top row of dots, you can see what it ended up looking like - or, rather, started looking like before I took to it with paint and brush in hand.


And here's what it ended up looking like: much more structured and "cutesy". The cutesy makes me wonder if it might do better in a place that wasn't our bedroom? Or maybe once the walls are a nicer colour (not pale lavender...) it won't look so little girl-room esque.


Though, even though I'm questioning my choices of colour, it does have a really cool mosaic feel to it... Maybe I'll try it again with some moody greys and more muted colours? Or perhaps I'll just put this away somewhere, and when we eventually have a baby girl it can go in her nursery...


I'm guessing you can tell by now that I'm always a bit indecisive about the art that I do. I guess you could say that I simply haven't done enough to feel confident that the pieces I create are even close to good. But I do enjoy it, and trial and error is always a good teaching tool! So here's to trial, and crossed fingers - hoping things turn out the way you imagine.