Exhibit A: Boring Billy
So though I had ideas of what I might do with Billy, to give him a lovely makeover, it took me quite some time to actually get out and change him up (big surprise there, right?). But one sunny, June morning, I left the house for a walk, and stopped in at our local fabric store. I searched high and low for the perfect cloth to re-do Billy's seat, originally an ugly, out-dated, brown pleather fabric, (I wanted something subtle, with coral as the main colour) when my eyes fell upon this.
Not at all subtle, but oh, so perfect!
It was destiny! I was sure. I snatched up a yard (as well as a yard of plain white fabric because the cloth was a thinner one and I wanted to make sure it wasn't see-through). When I took it home and showed it to Billy, he loved it too! (Billy became a very... flamboyant young man with the introduction of his new clothing). I also picked up a can of Rustoleum's flat black spray paint, because with such a lovely cloth, I couldn't leave Billy's legs such a boring brown!
Exhibit B: Removing Leg Brackets
The process of re-upholstering Billy was actually rather simple. I first unscrewed the brackets that held the legs on, and once those were apart, I took the old pleather off. Some of the staples were difficult to get out, and thankfully, my dear husband got in on the action (while I made us some supper).
Exhibit C: Dear Husband helping out... Mmmm...


Exhibits D & E: Stapling on the white fabric/what it looked like when the white was completely done.
Attaching the pretty fabric was essentially the same process as attaching the white fabric (though because its a little bit "silkier" it did cause some difficulties, and I also had to make sure that the pattern was lined up properly). But, all in all, I managed. And when Billy's seat was fully dressed up, all I had to do was attach the newly painted legs to the seat and set him up!
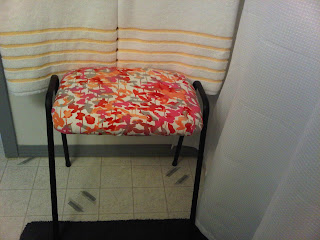
And of course, no tale of home decor improvement is complete without the after pictures. See how he shines? Billy is much happier, now, I assure you. For not only is he useful, but he's also quite handsome. Look how well he goes with the dark, moody bathmat, and the hugh, plush white and yellow towels! He fits right in.
Exhibit F: (For fantastic!)
So, that is the story of Billy the bathroom stool. Thank you all for reading!


No comments:
Post a Comment